Recently in TFS Top Tip Category

The Coach Just released the latest Radio TFS episode.  We got the whole gang together so decided to have a catch up and a chat about our first impression from using Beta 1 of Team System for a few weeks.

Play Now: Random Beta 1 Stuff

Links from the show:

It was nice to all be back together again.  Don’t forget to visit the Radio TFS site and subscribe to the podcast in iTunes or Zune for early access to all the latest shows.

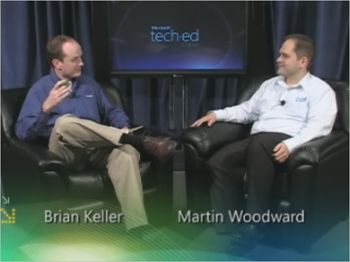
Last week at TechEd 2009 North America, I had the pleasure of sitting down with Brian Keller to discuss Teamprise past, present and future. If you have Silverlight installed you can watch the interview or you can download the video from the TechEd site.

Cross-Platform Development with Team Foundation Server and Teamprise

When you create a new build definition in Team Foundation Server, you get to define how the workspace looks for the build.  By default this includes the ENTIRE team project.  While this usually always works, it is nearly always not what you want.

Build Definition = What, How and When

You can think of a build definition as you telling TFS "What, How and When" you want to build something.  The "What" is covered by the workspace template.  The "How" is covered by the Project File (the TFSBuild.proj file in TFS2005 or TFS2008 or the WF Process in TFS2010).  The "When" is the trigger.

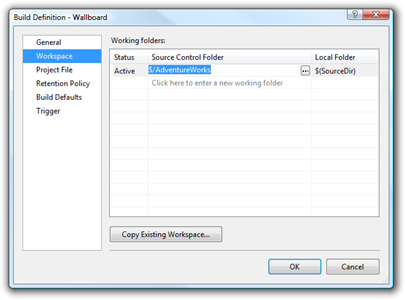
If you think about it, the "What" is pretty important. Not only does it include the files that are downloaded for your build, it also informs the trigger.  If you have set a build to run on every check-in then it needs to know what you are building to determine if the check-in applies to it.  If you set your "What" to be too broad then you will build when you don't need to.  If you set your "What" too narrow, then your build will not be triggered by files that impact the build.  This will become even more important when Gated Check-ins come along in TFS 2010, but doing this now will dramatically speed up the performance of your builds and mean that CI builds are done when something that you care about changes.  Let's take a look at the workspace template definition screen as it gets populated by default:
Build Definition - Wallboard

Notice that we have the server path of the Team Project mapped to the $(SourceDir).  You can click on either of these paths and edit them.  Most of the time, you just want to edit the server path to restrict it to the root of the project that you want to build such as:

Build Definition - Wallboard (2)

If you only learn one thing from this tip, then the above is all you really need to know to make your experience with Team Foundation Build much nicer.  However, the working folder mappings can get quite complicated if you want to.

Excluding Certain Folders from the Build.

Now, lets take a different scenario. Suppose you are working on a web site. You have your graphic designers also checking in their digital assets into the $/AdventureWorks/main/dotnet/Wallboard/assets folder in the project but you don't want to create a new build when they check in their huge Photoshop files - especially as the .psd files are not actually used in the website, just the .gif and .jpg files that they generate from the .psd's.  In this case you can use a cloaked working folder mapping to tell TFS to ignore those files from the trigger and when downloading source before a build.

Build Definition - Wallboard (3)

Building from Multiple Places

Another scenario you might be faced with is building two things at the same time from different parts of your source tree.  That's easy - simply add another Active working folder mapping and adjust your LocalFolder mappings accordingly:

Build Definition - Wallboard (4)

What Variables are Allowed?

In the Local Folder mapping you can hard code paths, but it isn't recommended.  There are two variables that can be used, $(SourceDir) and $(BuildDir). BuildDir is the build directory as defined in the build agent definition. $(SourceDir) is usually $(BuildDir)\Sources.  The "Sources" part is actually not hard-coded and can be modified by editing the TfsBuildServer.exe.config on the build agent machine if you wanted.  For example if you changed

<add key="SourcesSubdirectory" value="Sources" />

to be

<add key="SourcesSubdirectory" value="s" />

then $(SourceDir) would get expanded to $(BuildDir)\s on the build agent.  Therefore, $(SourceDir) is by far the most useful option.  That said - if you wanted to make your build to be triggered to changed to the TFSBuild.proj file, but for backwards compatibility with VS2005 you had your build configuration folder in the default "$/TeamProject/TeamBuildTypes" folder instead of the project's branch (which would be my recommended location) then you could use the $(BuildDir) variable to trick TeamBuild into triggering a build when the TFSBuild.proj file were modified by setting your build configuration as follows:

Build Definition - Wallboard (5)

By setting the server path to "$/AdventureWorks/TeamBuildTypes/Wallboard CI/*" and the local path to "$(BuildDir)\temp" we are telling Team Build to include the files in the root of the build configuration folder but to place them outside of the SourceDir so that they do not confuse our build process.  Note that in 2008 working folder mappings because a lot more flexible, so you can now map the root level of a folder using the Asterisk (*) wildcard and you can also map individual files as active or cloaked working folder mappings if you want to include or exclude individual files.

In summary, spend some time to think about what you want included in your build and do not be afraid to have your version control repository organized in a way that makes building it simple. One of the biggest problems when people move to a new version control system is that they inherit the repository layout from their old system rather than sitting down and thinking about what makes most sense with the new features or restrictions of the system that you are moving to.  Happy Building!

Microsoft Team Foundation Server 2008 has a great new improved build system (often referred to as "Team Build").  An advantage of running your build from Team Build is that (by default) all changes between your current build and the last good one are reported in the build report and any work items that were associated with those changesets are automatically updated with the build number they were fixed in.

However, when demonstrating this feature - the following thing always catches me out and is important to remember when using Team Build in production.  The very first time you run a build, it does not associate that build with changesets or update any work items.

Therefore, the first time your create a new build definition you should manually run a build and make sure it is successful. 

In fact I would recommend you do this anyway, even if the changeset association thing wasn't the case, after all you need to test that the new build definition you created actually works!

The reason why Team Build 2008 works in this way is that when Team Build successfully completes a build it stores the label applied to that last good build.  The next time it runs a build that is successful it will compare the two labels to detect which changesets were included in the build.  It will then look over those changesets for any associated work items and update them to include the build number in which they were fixed.

This tip is also true if you upgrade from TFS2005 to TFS2008.  Once the upgrade is complete you should run your builds once manually to check that they are all still working fine and to give a baseline from which changes can be detected.

If you are customizing a team build, then there are only two things you need to know to get you started.  The rest you can (mostly) figure out from there.

  1. Your build is defined in a file called TFSBuild.proj for your particular Team Build Type.  You probably figured that bit out already.  The first thing you need to know is that the TFSBuild.proj file inherits most of its logic from a file called Microsoft.TeamFoundation.Build.targets which lives in
    %ProgramFiles%\MSBuild\Microsoft\VisualStudio\TeamBuild\Microsoft.TeamFoundation.Build.targets.
    If you open this file in Notepad you can see that it is exceptionally well commented.  There is no smoke and mirrors with Team Build, if it happens at all then it triggered by this file. Note that you should never edit the Microsoft.TeamFoundation.Build.targets file.  In Team Build 2008 there are so many hook points provided for you to insert your own logic into the build that you should never need to.  Microsoft goes to some rather extreme lengths to ensure backwards compatibility with this file (i.e. a TFSBuild.proj file written with the TFS2005 targets file in mind will work just great with the 2008 targets file).  If you modify the targets file, not only are you setting your self up for deployment nightmares but you servicing nightmares as well if you attempt to upgrade to later version or even possibly service packs - don't say I didn't tell you ;-)
  2. If you get a bit lost in reading the targets file - the MSDN help for build customizations is pretty good.  The best starting point is the page "Understanding Team Foundation Build Configuration Files" - however the pages that this links to that I refer to constantly are Customizable Team Foundation Build Targets and Customizable Team Foundation Build Properties.  That said - most of the comments in those MSDN help pages are actually in the targets file itself - just sometimes the property or task you are after is easier to find in the MSDN help.

With Team Build in Team Foundation Server, you can have multiple build types for multiple projects.  For example, we have a build that runs fast that we can have running Continuous Integration on, and a slower build (that does obfuscation, release packaging etc) that is run on demand when we want to perform a release to QA (some of which later go on to become public releases).

A neat feature in the Team Build stuff is that you specify a drop location for your builds and the packaged binaries along with the build log and test results will be placed in a folder corresponding to the build name.  In all the demos you see, this will typically be specified as something like \\server\drop and you may well do this yourself at first.  Pretty quickly the drop folder will fill up with builds and get confusing.

A better way is a rather simple solution that I almost didn't mention, however when I mentioned this to a friend of mine and it caused some head-slapping, so I thought I'd discuss it here.  Apologies if you'd already figured this out this rather basic step.

Simply, put your builds into folders.  Something like:-

  • \\server\drop\product\buildType\

To give an example:-

  • \\jeeves\drop\teamprise\ci
  • \\jeeves\drop\teamprise\release

You can obviously take this further if need be.  For example we currently have builds going on in two main places, we are putting Teamprise 2.2 through final testing while, in parallel, we work on the next major release in trunk.  In the example above, it means we have 4 builds types in total and can follow the convention of \\server\drop\product\branch\buildType to make:-

  • \\jeeves\drop\teamprise\2.2\ci
  • \\jeeves\drop\teamprise\2.2\release
  • \\jeeves\drop\teamprise\trunk\ci
  • \\jeeves\drop\teamprise\trunk\release

 Pretty simple really, but helps to plan this stuff up front.

If (like me) you are using the tf.exe command line to access your Team Foundation Server via a Version Control Proxy from a remote office, then the following tip is extremely useful - much more so than my previous registry hack

There is currently no option with the Microsoft command line to pass a version control proxy server in to TF.exe.  It will pick one up if you have one set in the registry if you have used the Team Explorer GUI - but that isn't great for scripted scenarios.  James Manning recently pointed me in the direction of an undocumented environment variable called TFSPROXY.  If set, the TFS client will use that setting to proxy your requests.  Therefore the following will call tf.exe passing a proxy server to use in your connection:-

@echo off
setlocal
set TFSPROXY=http://your_proxy_server:8081
tf %*
endlocal

I saved this in a batch file called "tfvp.cmd" (for "tf via proxy"), therefore if I want to call tf via my proxy and I'm in a shell that doesn't have the environment variable set I can call my script.

The only command that this really useful for is when doing a tfs get command, as only the download is sent via the version control proxy server, the majority of requests go direct to the main Team Foundation Server application tier that you are connected to.

By the way, if you are using the Teamprise command line client then you can use the /proxy:http://your_proxy_server:8081 argument to specify a proxy server to use for the connection, I've just logged a bug so that we will also accept this undocumented environment variable, but we'll make it so that passing one explicitly will override any picked up from the environment variable.

Archives

Creative Commons License
This blog is licensed under a Creative Commons License.