Recently in Programming Category

This weekend I thought I would get round to a project that I’ve been meaning to do for a long time – a new website for the Radio TFS podcast that I do with Mickey and Paul.  I haven’t had the chance to play with WebMatrix before so thought that I would give it a try when building the new Radio TFS site.  I’m also behind in my learning's around ASP.NET MVC, WebDeploy and IIS 7 so it’s going to be a good weekend! 

One thing that I wanted to do was make sure that all the old episode links redirect to the new locations.  To do this I’m building a HttpHandler that listens for all the requests ending in *.aspx (which is what the episode links did) and then look up that link in the database to redirect them to the new link.  However it took me a while to figure out how to create a HttpHandler in Webmatrix.  As with everything – once you know the answer it is easy but as it took me a while to figure out I’m documenting it here in case others try searching for the answer with the same keywords I was using.

The first step is to create your HttpHandler class.  In the App_Code directory in your WebMatrix site create a new C# file (mine is called LegacyUrlHandler.cs).  A very simple HttpHandler is below.

using System;
using System.Collections.Generic;
using System.Web;

namespace RadioTFS
{
    public class LegacyURLHttpHandler : IHttpHandler
    {
        public bool IsReusable
        {
            // The same instance of this class can be re-used so we return true.
            get {
                return true;
            }
        }

        public void ProcessRequest(HttpContext context)
        {
            HttpResponse response = context.Response;
            response.Write("<html><body><h1>Hello World!</h1></body></html>");
        }
    }
}

You then have to register this HttpHandler in the web.config.  Assuming this is being deployed to IIS7 you register it as follows:

<?xml version="1.0" encoding="UTF-8"?>
<configuration>
    <system.webServer>
        .....
        <handlers>
            <add name="LegacyUrlHandler" verb="*"
                path="*.aspx"
                type="RadioTFS.LegacyURLHttpHandler"
                resourceType="Unspecified" />
        </handlers> 
    </system.webServer>
    ....
</configuration>

Hope that helps you.  I’ll probably be blogging again over the weekend as I discover more – and I’ll definitely let you know when the new site is live.

As you may have read over on Brian Harry’s blog, we recently made available a TFS SDK for Java.  This is the same core code that we use in Team Explorer Everywhere 2010 SP1 to talk to TFS from Eclipse and from our Cross-platform command line client – just packaged up into a single jar file to make it easier to consume and re-distribute in your own applications.

The TFS SDK for Java ships with a bunch of sample applications, check-in policies, custom work item controls and some handy snippets of code.  It also includes an Ant build script to allow you to build the samples that we ship.  However – I thought it would be interesting to walk through how you can consume the SDK in a simple Eclipse project and make use of some of the nice Eclipse features such as inline Javadoc.

To begin, download the TFS SDK for Java 10.1.0 from the download site and unzip it to a handy location. Next create a new blank Java project in Eclipse (File, New, Java Project).

New Java Project dialog in Eclipse

Give the project a name (i.e. com.contoso.tfsplay), then press Finish to create the empty project.  The next thing that we are going to do is browse to the empty project in the file system to copy over the relevant files in the SDK.  Having the SDK as part of your Java project makes it much easier to build and deploy it later.

First of all, browse to your Eclipse workspace folder in the file system (for example mine is at C:\play\tfssdk4j\com.contoso.tfsplay but you can find where yours is by right clicking on the project you just created and selecting properties).  Inside the project folder, create a new folder to hold your TFS SDK bits.  Mine is called tfssdk at the root at the folder.  Inside this copy the redist folder from the TFS SDK ZIP archive.  I also personally ZIP up the Javadoc folder from the TFS and also include it – however if you have a copy of the TFS SDK Javadoc installed on an intranet server somewhere you could just point to it later on.

Now that we have the SDK inside our project, if I press refresh back in Eclipse on the package explorer I get something that looks like the following:

Eclipse with the TFS SDK in a project

Now we want to configure the project to include the SDK in it’s build path. Right click on your project, select Properties, then Java Build Path.  In the Libraries tab press Add JAR… Select the com.microsoft.tfs.sdk-10.1.0.jar file from your tfssdk/redist/lib folder.  Now that the JAR file is included, we want to expand it to let Eclipse know about the Javadoc and the natives.  Double click on the Javadoc location and point it to where the TFS SDK Javadoc is located.  Do the same for the natives for your platform.

Configuring Java build path in Eclipse

Your JAR file definition should then look like the above and you are now up and ready to start talking to TFS via the SDK in your Java project.

For our example, let’s create a quick class with a main method. (Right click on the project, New, Class…)

New Class Dialog

Then inside the main method, I’ll quickly steal the code that Brian used in his TFS SDK for Java announcement blog post. 

Example code in Eclipse

Once the code is included and modified to point at my TFS project collection, I’ll quickly debug the code (Run, Debug As…, Java Application…)

I’ll be posting more samples shortly, but now the code is running let’s step through it.  To begin with we first need to get hold of a project collection. In Brian’s example he uses:

TFSTeamProjectCollection tpc =
            new TFSTeamProjectCollection("http://tfs2010:8080/tfs/DefaultCollection");

The reason this works is that the native code libraries are configured correctly so the SDK can then get the credentials of the logged in user and use those to authenticate with TFS.  However – what if you don’t want to use those credentials but want to pass them in via code?  Well luckily the TFSTeamProjectCollection has lots of overloads including one that allows you to pass username, password and domain.

Javadoc for TFSTeamProjectCollection

TFSTeamProjectCollection tpc =
            new TFSTeamProjectCollection("http://tfs2010:8080/tfs/DefaultCollection",
                    "username","domain","password");

In our example, we now want to query work items – so we get hold of a work item client as follows:

WorkItemClient workItemClient = tpc.getWorkItemClient();

We then create the query that we want to run.  In the example we’re going to execute an ad-hoc query in TFS’s Work Item Query Language (WIQL).

// Define the WIQL query.         
String wiqlQuery =
   
"Select ID, Title from WorkItems where (State = 'Active') order by Title";

// Run the query and get the results.         
WorkItemCollection workItems = workItemClient.query(wiqlQuery);


Finally, we then need to loop over the collection of results and display them.  The WorkItemCollection class contains logic to efficiently handle large result sets.  It will page in a set of query results as needed rather than waiting for all the results to be returned before you can start iterating over them.  This makes it much more efficient if you just need a page of data – i.e.

final int maxToPrint = 20;

for (int i = 0; i < workItems.size(); i++)         
{
    if (i >= maxToPrint)             
    {
        System.out.println("[...]");                 
        break;
    }
    WorkItem workItem = workItems.getWorkItem(i);
   
    System.out.println(workItem.getID() + "\t" + workItem.getTitle()); 
}


The full code for the QueryWorkItemExample is below.  Hope that is makes a bit more sense now that we’ve walked through it.  

package com.contso.tfsplay;

import com.microsoft.tfs.core.TFSTeamProjectCollection;
import com.microsoft.tfs.core.clients.workitem.WorkItem;
import com.microsoft.tfs.core.clients.workitem.WorkItemClient;
import com.microsoft.tfs.core.clients.workitem.query.WorkItemCollection;

public class QueryWorkitemExample {

    /**
     * @param args
     */
    public static void main(String[] args)
    {
        TFSTeamProjectCollection tpc =
            new TFSTeamProjectCollection("
http://tfs2010:8080/tfs/DefaultCollection",
                    "username","password","domain");
       
        WorkItemClient workItemClient = tpc.getWorkItemClient();
       
        // Define the WIQL query.         
        String wiqlQuery =
            "Select ID, Title from WorkItems where (State = 'Active') order by Title";
       
        // Run the query and get the results.         
        WorkItemCollection workItems = workItemClient.query(wiqlQuery);

        System.out.println("Found " + workItems.size() + " work items.");
        System.out.println();
       
        // Write out the heading.         
        System.out.println("ID\tTitle");
       
        // Output the first 20 results of the query
        final int maxToPrint = 20;
       
        for (int i = 0; i < workItems.size(); i++)         
        {
            if (i >= maxToPrint)             
            {
                System.out.println("[...]");                 
                break;
            }
            WorkItem workItem = workItems.getWorkItem(i);
           
            System.out.println(workItem.getID() + "\t" + workItem.getTitle()); 
        }
       
        System.out.println("Done");
    }

}

In future posts I’ll talk about how to do more advanced things in Java against TFS.  If you have any requests then please drop me a line, but for now take a look at the snippets that we ship in the SDK.  I’ll also be posting walkthrough posts discussing custom check-in policies in Team Explorer Everywhere, custom Work Item Controls as well as other ways of extending Team Explorer Everywhere and using the SDK.  Again – if you have anything in particular that you’d like me to use as an example then let me know.

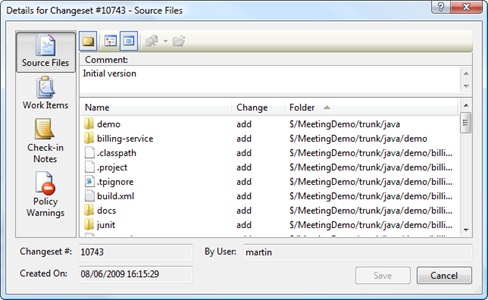
A feature of changeset metadata in Team Foundation Server 2008 is that it is actually editable.  If you look at the changeset details for a historical check-in in Visual Studio you will notice that the comment and check-in notes fields are enabled and there is a “Save” button. This is by design, but I have known customers that find this fact very surprising. 

Details_for_Changeset

In fact people are so surprised that this is even possible that in Teamprise we currently do not provide a way to edit the comment or check-in notes and guess how many customer requests we have had so far to add it?  I’ll give you a clue – it’s less than 1.

Anyway – apart from removing the odd bit of unsavoury language from a frustrated late night check-in, today I found a handy use for updating the comments after the fact.

In TFS 2008 SP1, Microsoft introduced a new feature in the server – to allow branches to be created and committed in a single operation.  This is exposed in the command line using the tf branch /checkin option or through the API using the undocumented VersionControlServer.CreateBranch method.  Creating a branch in this way is very fast because it bypasses the whole requirement to have a workspace created, working folders mapped, a branch to be pended and then the branch finally checked in.  It also uses significantly less server resources to perform which is why the feature got added in the first place.  Microsoft have some very large branches that they manage in TFS :-)

The problem with the current version of the CreateBranch method is that it doesn’t add a comment to the changeset during the branch operation.  But you can, as we now know, add a comment after the fact.  Below is a code snippet to demonstrate this:

public void CreateBranchWithComment(

    string serverUrl,

    string sourcePath,

    string targetPath,

    string comment)

{

    TeamFoundationServer tfs = new TeamFoundationServer(serverUrl);

    VersionControlServer vcServer =

        (VersionControlServer)tfs.GetService(typeof(VersionControlServer));


    int changesetId = vcServer.CreateBranch(

        sourcePath,

        targetPath,

        VersionSpec.Latest);


    Changeset changeset = vcServer.GetChangeset(changesetId);

    changeset.Comment = comment;

    changeset.Update();

}

Hope that helps somebody.  In TFS 2010 there is an additional overload of the CreateBranch method that allows you to optionally specify many things about the changeset created including a command and check-in notes so this workaround isn’t  necessary there. 

Remember, use your new found changeset comment altering powers for good rather than for pranking your colleagues.

CodePlex Open Source Wiki Engine

imageThe clever folks over at CodePlex have recently released the code to the sites excellent wiki.  As you would expect from CodePlex team, the code is available as a project on CodePlex at http://wikiplex.codeplex.com.  Even better news is that the code has been released under the permissive MS-PL open source license.
Anyone fancy getting it integrated with Sharepoint?

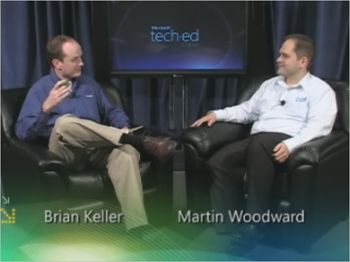
Last week at TechEd 2009 North America, I had the pleasure of sitting down with Brian Keller to discuss Teamprise past, present and future. If you have Silverlight installed you can watch the interview or you can download the video from the TechEd site.

Cross-Platform Development with Team Foundation Server and Teamprise

Rock The Build with TFS

If bunnies are just a little bit too cute and fluffy for you, then you might be interested in a little side project that reader Terry Humphries just got in touch with me about.  You see Terry had no love for robotic rabbits in the build process – but an electric guitar was something that he and the other developers in his team would pay attention to. So he hooked up a vintage 1990’s Warlock Electric guitar made by B.C.Rich to TFS and let that rock their world.  I thought this was a cool project so asked permission to share his email with you all. If you want to get in touch with Terry, drop me a line and I’ll send your details on to him.


From: Terry Humphries


guitarMy name is Terry Humphries and I work for EnGraph Software. I’ve been a developer for over 25 years the last three months at EnGraph. I came here to join a development team that was scaling up from a couple of developers to over 14 folks. Part of my job has been and continues to be leading EnGraph’s push into using Team System. I spend part of my time wearing a developer hat and part wearing the TFS admin, Build Sensei hat.

Having always been a strong believer in nightly builds and making sure everyone is aware of the status of the build, I’m always looking for ways to get the other developers invested in the status of the build.

Having seen Brain aka the Build Bunny and the Lava Lamp build indicator I decided it was time to create something unique for EnGraph to use.

I almost used a full size traffic light, but since all of the pcs here are named after guitar manufacturers, a Build Guitar seemed the way to go, and the search was on. It took me about three week to locate the used Warlock I used as the basis of the project. I didn’t want a run of the mill guitar, it need to be electric and it needed to have a unique look. When I got the Warlock it’s better years were behind it, the body was in bad shape. I had to end up stripping it, filling in a few dings and refinishing it with a purple undercoat and a bronze metallic pearlized overcoat.

I looked at several options for the switching mechanism for the LEDS. Basically, I wanted something that would provide the low dc power needed to drive the LEDS and a programmable interface for switching them on/off. I considered Ethernet based relays, Bluetooth based relays, Ethernet to parallel port converters, and USB controlled relays. Mostly because the other options were much more costly I settled on the USB controlled relay. I decided to mount this control circuit in its own box and use standard Ethernet cabling to get the power to the guitar from the relay. With this option the only things I had to mount in the guitar were the LEDs, the Ethernet jack, and wire connecting them.

Once I obtained everything I need I started build the controller. Wanting it to also be somewhat different I decided to mount the relay circuit old 3.5 diskette plastic case that was designed to hold 10 diskettes. After mounting the circuit board I added the ethernet jack and connected the power supply. Cut a few hole for the cables and bam the Build Guitar Controller was born.

Next, guitar time. I decided the best place to mount the LEDs was in one of the pickup coil frames, you see a Warlock comes with 2 Humbucker pickup coils each mounted in its own frame. I fashioned a piece of black plastic to fit the frame and drilled three holes for the LEDS. Then I wired the LEDS to the Ethernet jack I had placed in the jackplate.

Then I hooked everything up loaded the Phidgets drivers and using they’re control panel applet tested the wiring and after a few minutes I had everything working as planned.

The folks at Phidgets provide 2 way to interface with their devices, either directly or via a webservice, I used both. I couldn’t find a TFS event that fires when a build starts so I created a custom task that turned on the correct relay and hooked it into our build scripts via the BeforeEndToEndIteration target and then used Howard van Rooijen TFS Event Framework to react to the BuildCompletionEndpoint to set the red and green leds.

The basic code for manipulating the relays is only 9 lines:

InterfaceKit RelayPhidget = new InterfaceKit();

RelayPhidget.open("gibson", 5001);

System.Threading.Thread.Sleep(1000); //wait for the server to connect

RelayPhidget.outputs[0] = false;     //Set build start off

RelayPhidget.outputs[1] = true;      //Set build success on

RelayPhidget.outputs[2] = false;     //Set the other off

RelayPhidget.outputs[3] = false;

RelayPhidget.close();

RelayPhidget = null;

I’m not sure what else I can tell you about it other that it’s a big hit with the other developers. As for more about EnGraph you can visit our web site at www.engraph.com

Hardware:

  • Warlock Electric guitar made by B.C.Rich vintage 1990s
  • 10MM diffused LEDS in Blue, green and red
  • Phidget Interface Kit 0/0/4 available here
  • 5VDC 350milliamp wallwort power supply
  • Various bit of wire, tape glue paint, etc.

Software:

  • Team Foundation Server Notification Event project template from Howard van Rooijen
  • VS2008
  • Phidgets Driver


Thanks for sharing this with me Terry, and for allowing me to post your email.  For anyone interested, I’ll be talking more about integrating with Team Foundation Build API’s during my session at Tech·Ed North America 2009 next week.

DTL307 Brian the Build Bunny: Extending Team Foundation Server Build

Fri 5/15 | 9:00 AM-10:15 AM | Room 404

This session digs deep into customization of the Microsoft Visual Studio Team System Team Foundation Server Build system. Learn about the .NET API for Team Foundation Build and how to use it to create your own build status display or even have your team chastised about build failures by a robotic rabbit.

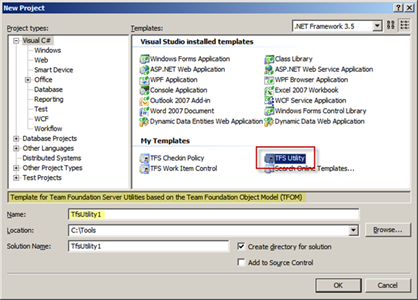
My friend and fellow Team System MVP, Neno Loje, has been on a blogging frenzy this year. Recently he has published a handy Visual Studio template if you do a lot of playing with Team Foundation Server API calls (as I do), or if you are trying to play with an TFS API example that you have found on the net but are having trouble finding the assemblies required to use it.

image

Go check out Neno’s post now if you are serious about TFS API development, and while you are at it be sure to subscribe to his blog.

Archives

Creative Commons License
This blog is licensed under a Creative Commons License.